

For the Guys & Gals - AECP Level 1 Final Challenge!!
- Nov 15, 2021
- 6 min read
It’s here – the final challenge for Level 1 and I’m excited to share the results of my efforts with you. The challenge is to use at least 3 components from the Level 1 courses to create two gift sets containing at least 4 cards; one set for “Him” and one set for “Her". Since it’s to be a set, there should be a similar theme or other form of cohesiveness so that the cards look like they belong together. In addition, I need to be creative and come up with the packaging for the 2 sets of cards AND somewhere in here I need to use a recycled element!
I certainly am glad that I’d been challenging myself all through Level 1 to create at least one card using the course technique that would work for “Him”!
It was great fun working through this challenge – and a challenge it was! Mostly on the timing perspective!!!! Please note – I have videos in the works that I plan to post very soon on YouTube – just not in time for the challenge ☹
I decided to make 6 cards for each set taking advantage of making 2-for-1 cards.
TIP: You don't have to overthink card designs when planning a card "for the guys" - often times you can really use the same techniques and designs for both but change the feel of them merely by changing the colors.
It was hard to filter down all of the courses to pick just 3 techniques - there are so many great ideas through the 10 courses. However, before I started the designs I determined to hone in on the following:
Easy Die Cutting Techniques – I love that you can use dies as they are intended or as a stencil for something else. I bring in the use of both during this challenge. You’ll see them used for Negative Die Cutting and Stenciling!!
All About Layering – So many of the Altenew stamps are “all about layering” and being able to become comfortable with it is important (notice… I DID NOT say “master it”!!) I really love the Layered Cupcake stamp set.
Clean & Simple Boutique Cards – while “more” is often so much more of my style, there is something lovely about the Clean & Simple cards. They come together quickly and can look quite elegant – sometimes even being designed out of left-overs. You’ll see an example of that in the last card in my sets.
As we go along, I'll point out a few other techniques that I filtered in. I hope you enjoy the results!


Check out the YouTube video to see how I made the "For the Gals" set!!
Cards 1 & 2
2-for-1 HI – in this set of cards I’m bringing in many of the inspiration from the course Easy Die Cutting Techniques. Using the Altenew Tie Die Motifs and Bold Alphabet Die sets I took advantage of the Negative Die Cutting technique to create 2 simple and fun cards.


To begin I used the middle set of strips from the Tie Die Motifs stamp set to stamp rows using Distress Oxide inks in:
For the Guys | For the Gals |
Salvage Patina | Festive Berries |
Spiced Marmalade | Mustard Seed |
Scattered Straw | Carved Pumpkin |
Vintage Photo | Victorian Velvet |
Rustic Wilderness | |
Here are some of the work-in-progess photos...


Next I ink-blended a scrap piece of cardstock with Salvaged Patina (for the Guys) or Festive Berries (for the Gals). Once complete, I picked the H & I out of the Bold Alphabet Die set and used my new Biracraft die cutting machine to cut out the sentiment for this card & create the sentiment for the 2nd card. Additionally, I used the same dies to cut the Hi sentiment from stash black cardstock (for the Guys) and from the leftover ink blended panel of Festive Berries (for the Gals) I placed that behind the die openings. To give the “Hi” a bit more pop, I outlined the inside with a black marker on the for the Guys card. I didn’t think the same was needed for the Gals 😊
TIP: To add more dimension, even with foam, run around the border of your panel with a darker color… BE SURE TO LET IT DRY before moving on, or you’ll find yourself having marks all over the place and having to start over!
After outlining the edge, I added some craft foam to the back and adhered it to my cardbase.
For the second card in this set, I quickly blended Salvaged Patina (for the Guys) and Mustard Seed (For the Gals) on a 4 x 5/14 card panel and then glued the black or festive berries shadow to the original sentiment. Picking the small and medium strips I created a varying texture of borders around the sentiment. For the Guys I used Mustard Seed along the bottom and Rustic Wilderness with Spiced Marmalade on the side. For the Gals I used Festive Berries on the bottom and Victorian Velvet and Carved Pumpkin for the sides. For the Guys, I went around the edge with black and very lightly with Festive Berries For the Gals. I added some craft foam to the back of each and place them on the card base.
The 4 cards were really quick and easy to put together!
Cards 3 & 4
2-for-1 Birthday set

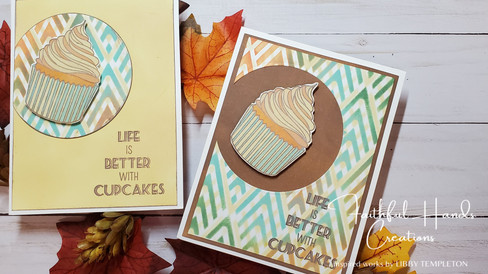


For this one, I’m utilizing techniques from Easy Die Cutting Techniques and All About Layering. I pulled in my favorite Altenew Layered Cupcake stamp set, Deco Wallpaper stencil, and Halftones Circles Nesting Die set for both of these cards.
To begin, I blended a background through the Deco Wallpaper stencil using Distress Oxide ink again:
For the Guys | For the Gals |
Antique Linen | Antique Linen |
Salvaged Patina | Carved Pumpkin |
Spiced Marmalade | Victorian Velvet |
Rustic Wilderness | Mustard Seed |
Vintage Photo | Festive Berries |
Then I used the Halftones Circle Nesting dies to cut a circle out of the side of this panel. The cutout I saved for the second card. Next I created 2 cupcakes with the Layered Cupcake stamp set as follows:
For the Guys | For the Gals |
Outline – Vintage Photo | Outline – Vintage Photo |
Wrapper1 – Scattered Straw | Wrapper1 - Spun Sugar |
Wrapper2 – Salvaged Patina | Wrapper2 - Brilliance Galaxy Gold |
Cake – Rusty Hinge | Cake - Vintage Photo |
Frosting base – Antique Linen | Frosting base - Mustard Seed |
Frosting 2 – Scattered Straw | Frosting 2 - Victorian Velvet |
Frosting 3 – Spiced Marmalade | Frosting 3 - Festive Berries |
After stamping both cupcakes for each of the 4 cards, I fussy cut them out and set aside to assemble later.


To finish it all off, I ink-blended Vintage Photo and Scattered Straw on 4 x 5/14 card panels for the Guys and Victorian Velvet and Brilliance Galaxy Gold for the Gals. For the first card, I adhered the stenciled panel to the brown background and stamped the sentiment using my Misty with Vintage Photo. For the 2nd card, I inked around the edges of the card panel and the stenciled circle with Vintage Photo for additional pop and then placed the circle in place. Once again, I stamped the sentiment with Vintage Photo. After the bases were ready, I placed some fun foam on the back of the cupcakes and adhered them within the circles. I glued the final panels on the card bases. Another quick set of 2-for-1 cards!
Cards 5 & 6
2-for-1 Hello & Thank You
Key components for these come from the Easy Die Cutting Techniques (using them for something else) and Clean & Simple Boutique Cards. I’m also pulling in the recycled element in this set. You’ll likely see the “yen & yang” of styles here – my love of mixed media in comparison to clean and simple!


Using the Altenew Square Weave and the Deco Wallpaper stencils, the Altenew Shattered Triangle Die set, Simple Shapes stamp set, Many Thanks stamp set, and Rosie Posy stamp set, I’ve created 4 fun cards!
To start off, I blended a background of Vintage Photo (for the Guys) and Festive Berries (for the Gals). Then I pulled out the stencils and randomly blended in Hero Arts Unicorn White and Carved Pumpkin. I love this component of mixed media – layering varying bits for a background. Next I pulled in the part of recycled elements… I have some vintage books in my stash so I tore out some pieces to do a bit of collage work. I created some “squares” and a bit for the sentiment. To roughen them up a bit more, I inked around the edges and crumpled up the paper. After carefully flattening the bits back out, I glued them on to the background.

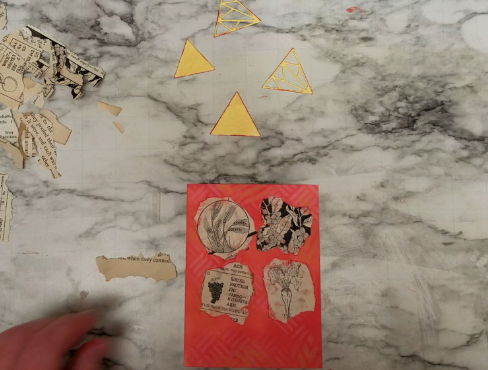


For the next component of this card, and as a tool for the last card, I inked up a bit of background in Distress Oxide Salvaged Patina (for the Guys) and Brilliance Galaxy Gold (for the Gals). I die cut some of the triangles out of each using the Shattered Triangle Die set. After removing the cut pieces, I saved the remainder for the 2nd card. To finish off this card, I inked around the edges of the die cut pieces (Spiced Marmalade for the Guys, Festive Berries for the Gals) and then use the Hello sentiment from the Rosie Posy mini stamp set to stamp the sentiment. I glued all those pieces in place, put some craft foam behind the panel and adhered it to the card base.
For the final card – the Clean and Simple card! I scored 4 rows at 1/8” using my scoring board. Then I masked this panel off. I pulled out the remainder from the triangle die cuts above to use as a stencil. Very lightly, I inked in several triangles in Salvaged Patina (for the Guys) and Festive Berries (for the Gals). Then I used the 2 triangle outline stamps from the Altenew Simple Shapes stamp set to fill in with varying colors from the palate I was using. I then stamped the sentiment using the Altenew Many Thanks stamp set. Keeping it simple, I adhered it to a white card base and called it complete!


Boxing it all up!
With all the cards complete, the final piece of the challenge is to make a container of sorts to give the gift in. I decided an opening “box” would work for me so I tested out a few things. Here is the result:


The following are links to the tools I used for these projects.
Please note that some contain affiliate links which means I may earn a small commission when you click and purchase - at no additional cost to you! This helps to support my blog. Thank you!!


Great cards, Libby! Like the vintage look you gave to all the pieces. Lovely work! Thank you for submitting your work to the AECP assignment gallery.