

Complexity is NOT required!!
- Aug 30, 2021
- 3 min read
Clean & Simple cards (otherwise often known as CAS) are not something that I often do… I love they way they look but I often seem to lean more towards “more” on my cards or perhaps more “grunge”. Whatever you call it, it’s more than likely not CAS. So, I was excited to take the course Clean & Simple Boutique Cards by Jennifer Rzasa! There are 6 different lessons in this course, and it’s packed with helpful tips. I’ve chosen 3 of them to guide the creation of the 3 cards I’ll share with you this week.
The first 2 both focus on simple styling – just a few ink colors on one layer – clean and easy!
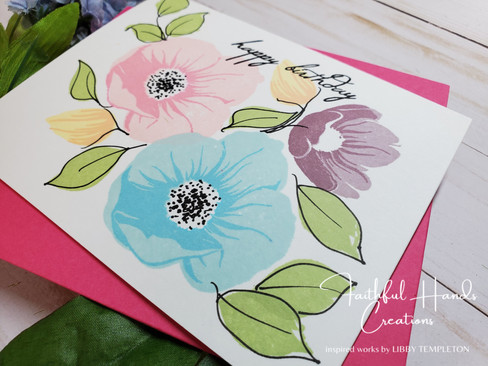
First up – a super easy birthday card! It didn’t take a long time to plan and I honestly could’ve made this one right before I headed out to a birthday celebration. I pulled out the Altenew Hellebore Build-a-Flower stamp set for the floral image, the Altenew Strength Blooms stamp set for the leaves, and the Altenew Birthday Greetings stamp set for the sentiment.

I inked up the flowers using Catherine Pooler It’s a Girl, and Altenew Crisp Inks in Frosty Pink, Amethyst, Grape Agate, Sea Glass, Ocean Waves, Buttercream, and Peach Perfect. For the leaves, I used Altenew Crisp ink in Frayed Leaf. I really loved the tips about not worrying about being too precise – you can really see that on the leaves. On this card I also added in the tip of using a pen to add hand-drawn details to your projects. I really like the way the black pen (I used Copic Multiliner in .5) added detail to the leaves and had fun adding the dots to the center of the flowers. For the sentiment, I quickly inked up the sentiment with Altenew Obsidian Black and stamped it right over a bit of the flowers.


The second card was also quick and easy. It could be used to send to any of the guys I know (remember I said I plan to challenge myself by incorporating a more masculine card with each course!)

Once again, I picked a sentiment from the Altenew Birthday Greetings stamp set – I’m getting a great deal of use out of that one! For the focal image I chose the Altenew Tie Die Motifs stamp set. I inked up a few of those stamps using Altenew Crisp inks in Buttercream, Maple Yellow, Peach Perfect, Sea Breeze, and Starlight. Another one-layer card that came together so quickly and easily. Both of these would be so simple to mass produce if needed.


The final card this week brings in the tip that any stamp can become a background. In this case, I chose to use the Altenew Modern Eucalyptus mini stamp to create a background. I also incorporated the tip of not stressing perfection as I added watercolors to the vases.

To begin, I inked up the stamp quite a few times with Versafine Clair Nocturne ink on watercolor paper. Once I finished with that, I pulled out my Altenew Artists Watercolor 24 pan set and began dropping color on the vases with a wet brush. I stamped the sentiment from the Altenew Sentiments Strips stamp set (another one I’ve been using a lot lately) on a scrap bit of card stock using and then embossed with white embossing powder. I added craft foam behind the watercolor panel and placed it on a top folding A2 size card base.


The following is a list of the tools I used for these projects.
Please note that some contain affiliate links which means I may earn a small commission when you click and purchase - at no additional cost to you! This helps to support my blog. Thank you!!


These are gorgeous!!! I love ALL of them!! So beautiful!
Thank you for submitting your wonderful work to the AECP assignment gallery.