

Ink Blending - Love it or hate it??
- Aug 12, 2021
- 5 min read
If you’re like me, you may have a love/hate relationship with ink-blending! I love the results that I see when others share ink blending techniques, but I often “hate” the results of my efforts. I have to say, that I really appreciate the way that I was able to learn ways to hide my not-so-perfect abilities as I worked through the Altenew Easy Ink Blending Techniques by Amy Lee. To clarify - Amy didn't say anything about "hiding flaws" - I'm merely happy that I figured out that some techniques enabled it. My favorite technique in this course is how to create faux watercolor – because it’s so beautiful AND it really makes rough transitions more forgiving.
One of the tips that Amy shared is to “remember that it is OK to not have a perfect blend at first. Let your ink dry and it will probably smooth out on your paper.” I’m going to have to try that out – because I’m typically in a hurry and ready to make the card.
I was on a roll practicing ink blending and decided on several ways I’ve found helpful to “hide” my rough blending while I continue to practice:
Faux Watercolor
Stencils
Embossing folders
Dies
Today I’ll share 4 cards to share with you demonstrating these techniques.
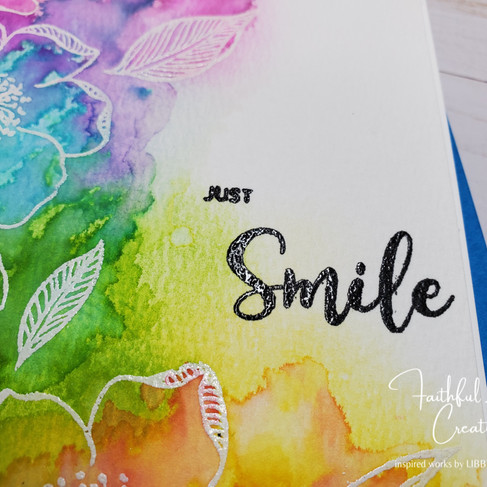
Since I mentioned that my favorite technique is the faux watercolor, I’ll start with it.
To begin, I embossed flowers from the Altenew Adore You Stamp & Die set with white embossing powder on watercolor paper. I then started blending several inks using Altenew Ocean Waves and Desert Night as well as Catherine Pooler Limoncello, Grass Skirt, Flirty Fuchsia, and Pucker Up. Then I just started adding water to get the color to move and get the watercolor appearance. After it dried, I went back and added Catherine Pooler Tiki Torch and Samba to the yellow area for some variation and I added some more of the Altenew Desert Night into the purple area.

Once it was dry, I stamped the Just Smile sentiment from the Altenew Tie Die Motifs stamp set using Altenew Obsidian Black and embossed it with clear embossing powder. I added some craft foam to the back of the panel and adhered it to a top folding A2 card base.


Next is a fun card that mixed stenciling and die cutting!

The first thing that I did for this card was pull out my Altenew Square Weave Pattern stencil for the background. I sprayed it with Pixie Spray (a super light adhesive) so that it would stay in place on my cardstock while I did the ink blending. I used Catherine Pooler Limoncello and Tiki Torch which gave it a really bright look – and using the stencil helped disguise the rough transitions I’m famous for. Next, I just started blending a variety of colors on another piece of cardstock (Catherine Pooler Grass Skirt, Garden Party, Party Dress, Flirty Fuchsia, Tiki Torch). Once I was done with that, I spritzed it lightly with water to distress it a bit. Then I pulled out the Altenew Wildflower Garden Stamp & Die set and picked a couple of flower/leave combinations. I cut them out using my Big Shot and adhered them to the stenciled panel. I added a bit of craft foam behind the flowers and one set of the leaves to add some dimension. Finally, I used Catherine Pooler Party Dress to create a pink border panel (which I also spritzed with water) and matching pink for my sentiment. I cut the sentiment using the Altenew Fancy Hello Die, covered it with WOW Embossing Ink, and applied clear embossing powder for some shine. To assemble the card, I placed some craft foam behind the stenciled panel, glued it to the pink border panel, and then glued that all to an A2 card base.


While I have completed the “For The Guys” course, I’ve decided to challenge myself with the rest of the Level 1 courses by including a card that could be used for the guys. Practice makes perfect – and I think that considering how to make cards for the men in my life will be a challenge for a while. This card was fun and really easy to put together. I actually think I could mass produce them with no huge effort.

To begin, I blended Altenew Sea Glass, Ocean Waves, and Dusk Crisp Inks starting with the lightest in the center and radiating out getting darker. I then used the Altenew Layered Cupcake stamp set to stamp the cupcake using Versafine Clair Twilight for the outline image and filling in the colors with Altenew Dusk and Ocean Waves for the wrapper, Buttercream, Maple Yellow, and Peach Perfect for the frosting, and Distressed Oxide Vintage Photo for the cake. Once done, I fussy cut out the cupcake. I selected a sentiment from the same stamp set and stamped it with the Versafine Clair Twilight and embossed with clear embossing powder. I also fussy cut that out. Finally, I pulled out the Altenew Radial Stars Cover Die and cut it out of some stash gray card stock. I glued that right on the blue blended background, added some craft foam behind the cupcake and sentiment and glued them on top, then glued it all to a top folding A2 card base. It’s a simple card – but I’m really liking it!

The final card I’ll share for this class brings in the use of an embossing folder. I created an ink blended panel using Catherine Pooler Flirty Fuchsia and Be Mine. I cut a piece of to use for my sentiment later and then ran the panel through my Big Shot using the Altenew Angled Mosaic 3D Embossing folder. I really like the dimension that provided and that also helps draw the eye away from blending lines. I stamped a small bit of the Be Mine ink on my craft mat, added a little water to it, and then splattered that color on the panel using a fan paint brush. To give it a bit more pop, I flicked some of the Altenew Pure White Ink Spray as well.

Next, I selected some butterflies from the Painted Butterfly Stamp & Die set. I stamped them with WOW Embossing Ink and embossed them with white embossing powder. Once the embossing cooled, I cut them out using the coordinating dies and my Big Shot. I colored one of the butterflies with some of the Be Mine ink, so it’d stand out better on the white panel I planned to adhere it to.
I decided the top and bottom frame of the ink blended area needed something more, so I decided to score the cardstock at ¼” intervals using my mini score board. To assemble, I added some washi tape from my stash to the “frame” and put some craft foam behind each piece. I glued those to the ink blended panel. Next, I hid some glue dots behind the embossed areas on the butterflies and adhered them to the panel. The glue dots enabled some additional dimension in that area. For the sentiment, I selected Just Saying Hello from the Painted Butterfly Stamp & Die set, stamped it with WOW embossing ink, and embossed with white embossing powder. After placing it on the bottom frame, I added the colored butterfly and finished it all of with some matching sequins.


I had a lot of fun making these cards and hope you enjoy them too! Please leave a comment and let me know what you think.
I’m excited to continue this journey! Next week, you’ll see what I came up with after the Clean & Simple Boutique Cards course.
The following is a list of the tools I used for these projects.
Please note that some contain affiliate links which means I may earn a small commission when you click and purchase - at no additional cost to you! This helps to support my blog. Thank you!!


Looks more of a love-love relationship to me that you are not admitting to LOL Your cards look amazing!! You have done a wonderful job!! Thank you for submitting your wonderful work to the AECP assignment gallery.